Chicken Katsu Ideas: How to Make the Perfect Cutlet
Introduction
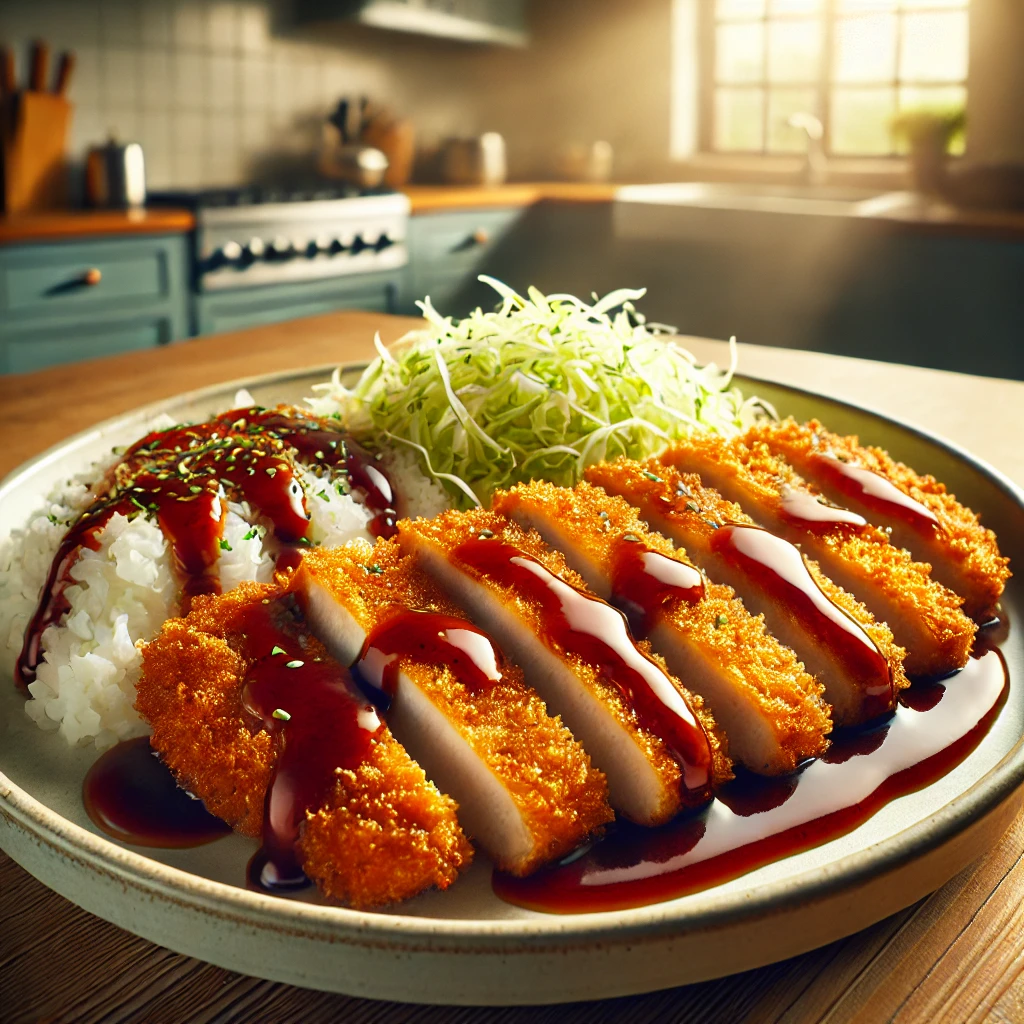
Chicken Katsu is a beloved dish in Japanese cuisine, known for its crispy, golden-brown coating and tender, juicy interior. This breaded and deep-fried chicken cutlet is a staple in Japanese restaurants and home kitchens alike, often served with steamed rice, shredded cabbage, and Tonkatsu sauce—a sweet and tangy condiment that enhances its flavor.
What makes the perfect Chicken Katsu? It’s all about achieving the ideal crunchy texture while keeping the chicken moist and flavorful. Using the right ingredients, cooking techniques, and seasonings can elevate a simple katsu cutlet into an unforgettable meal.
In this blog, we’ll explore step-by-step cooking methods, creative Chicken Katsu variations, and expert tips to help you make the crispiest, most delicious cutlet at home. Whether you prefer traditional deep-frying, a healthier air-fried option, or unique serving ideas, this guide has got you covered!
1. What is Chicken Katsu? A Japanese Comfort Food
Chicken Katsu, or チキンカツ (Chikin Katsu), is a popular Japanese dish consisting of a breaded and deep-fried chicken cutlet. It is a variation of Tonkatsu, which is traditionally made with pork, but Chicken Katsu has become equally loved for its crispy exterior and juicy interior.
The dish is typically made by coating boneless chicken breast or thigh in flour, beaten egg, and panko breadcrumbs, then frying it until golden brown and crunchy. It’s commonly served with steamed rice, shredded cabbage, and Tonkatsu sauce, a rich and slightly tangy condiment that complements the crispy cutlet perfectly.
As a staple in Japanese home cooking and restaurants, Chicken Katsu is often enjoyed as a quick meal, bento box favorite, or even in sandwiches. Its delicious crunch and comforting flavors make it a go-to dish for both kids and adults alike!
-Origin and Meaning of Chicken Katsu
The word “Katsu” (カツ) is derived from the Japanese pronunciation of the English word “cutlet”, which refers to a thinly sliced and breaded piece of meat. Chicken Katsu is a variation of Tonkatsu (豚カツ), a dish originally made with pork, which became a staple in Japanese cuisine during the late 19th century.
Historical Background
The roots of Katsu trace back to the Meiji era (1868–1912) when Japan was rapidly modernizing and embracing Western influences. Inspired by European-style breaded and fried meats, particularly the Austrian Wiener Schnitzel and the French Côtelette, Japanese chefs adapted the dish using local ingredients and techniques. The result was Tonkatsu, which quickly became a popular meal due to its satisfying crunch and savory flavor.
While pork cutlets dominated the early Katsu dishes, the Chicken Katsu version gained popularity as a lighter alternative, especially for those who preferred poultry over pork. Over time, it became a favorite in Japanese households, casual eateries, and bento boxes.
The Meaning and Cultural Significance
Beyond its delicious taste, Katsu carries a symbolic meaning in Japan. The word “Katsu” also means “to win” (勝つ) in Japanese, making it a popular dish for students before exams or athletes before competitions, as eating Katsu is believed to bring good luck and success.
Today, Chicken Katsu is enjoyed worldwide, not just in Japan. Its versatility has led to various adaptations, from the classic Chicken Katsu Curry to the trendy Katsu Sando (Katsu Sandwich), proving that this crispy, golden cutlet is here to stay as a comfort food favorite.
-Difference Between Tonkatsu (Pork Katsu) and Chicken Katsu
Both Tonkatsu and Chicken Katsu are popular Japanese katsu-style dishes, featuring crispy, breaded, deep-fried cutlets, but they differ in key aspects, including the type of meat, texture, flavor, and traditional pairings.
1. Type of Meat Used
- Tonkatsu is made with pork cutlets, typically from the loin (rosu katsu) or fillet (hire katsu).
- Chicken Katsu is made with boneless chicken, usually chicken breast for a leaner option or chicken thigh for a juicier texture.
2. Texture & Flavor Profile
- Tonkatsu has a richer, more savory flavor due to the fattiness of pork, making it succulent and juicy inside while still crispy on the outside.
- Chicken Katsu has a lighter, milder taste, with a leaner texture when made with chicken breast, or more tender and flavorful if made with chicken thigh.
3. Cooking Time & Preparation
- Pork cutlets in Tonkatsu are typically thicker, meaning they take slightly longer to cook than Chicken Katsu.
- Chicken Katsu tends to cook faster since chicken breast is generally thinner and more delicate.
4. Traditional Pairings & Serving Styles
- Tonkatsu is commonly served with:
- Tonkatsu sauce (a thick, sweet-savory sauce made from Worcestershire sauce, soy sauce, and fruits)
- Steamed rice and shredded cabbage
- Miso soup and pickled vegetables
- As part of Katsudon (a rice bowl with egg and dashi broth)
- Inside a Katsu Sando (Japanese pork cutlet sandwich)
- Chicken Katsu is often paired with:
- Tonkatsu sauce or other variations, such as spicy mayo, curry sauce, or teriyaki glaze
- Japanese curry (Chicken Katsu Curry) for a heartier meal
- Ramen bowls as a crispy topping
- Donburi-style rice bowls with eggs and soy-based sauce
5. Popularity & Dietary Preferences
- Tonkatsu is a classic choice in Japan, traditionally enjoyed by those who prefer rich and fatty meats.
- Chicken Katsu is often preferred by those looking for a lighter, healthier option while still enjoying the same crispy, breaded texture.
Final Thoughts
While both Tonkatsu and Chicken Katsu are crispy, satisfying Japanese comfort foods, they each offer distinct flavors and textures. Whether you prefer the richness of pork or the light, lean taste of chicken, both variations are delicious, versatile, and easy to prepare at home!
-Common Ingredients Used in an Authentic Katsu Recipe
Making an authentic Chicken Katsu starts with the right ingredients. While the recipe itself is simple, using high-quality ingredients ensures the perfect crispy coating, juicy chicken, and balanced flavors. Here’s a breakdown of the essential components:
1. Chicken: The Star Ingredient
- Chicken Breast – The most common choice for Chicken Katsu, offering a lean, tender bite when properly prepared.
- Chicken Thigh – A juicier and more flavorful option due to its higher fat content, preferred by those who enjoy richer textures.
- Boneless and Skinless – Traditional Chicken Katsu uses boneless, skinless chicken for an even, crispy crust.
2. Panko Breadcrumbs: The Key to a Crispy Coating
- Panko (Japanese Breadcrumbs) – Unlike regular breadcrumbs, panko is lighter and airier, creating a crunchy, flaky texture.
- Fresh vs. Store-Bought Panko – Freshly made panko can provide an even more delicate crispness, but store-bought options work well too.
- Alternative Coatings – For a unique twist, some variations use cornflakes or tempura batter for extra crunch.
3. Breading Station: The Three-Step Coating Process
A proper coating process is crucial to achieving an evenly fried cutlet:
- Flour (All-Purpose or Rice Flour) – Helps the egg mixture stick to the chicken, creating a solid base for the breadcrumbs.
- Egg Wash – A simple mixture of beaten eggs, sometimes with a splash of milk or water, ensuring the panko adheres well.
- Panko Breadcrumbs – The final coating that gives Chicken Katsu its signature crunch.
4. Seasonings: Adding Depth of Flavor
While Chicken Katsu is often paired with Tonkatsu sauce for flavor, seasoning the chicken itself enhances its taste. Common seasonings include:
- Salt and Black Pepper – The most basic yet essential seasonings to enhance the natural flavor of the chicken.
- Garlic Powder or Fresh Garlic – Adds a mild savory depth.
- Soy Sauce & Mirin – Some recipes include a light marinade with soy sauce and mirin to infuse umami flavors.
- Dashi Powder – Occasionally used in the breading mixture for an extra touch of Japanese umami.
5. Oil: Choosing the Right One for Frying
- Neutral Oils – Use oils with a high smoke point and neutral flavor, such as vegetable oil, canola oil, or peanut oil.
- Deep Frying Temperature – Ideal frying temperature is 325–350°F (163–177°C) to ensure a crispy crust without burning.
- Oil Maintenance – Fry in small batches and remove any burnt panko crumbs to keep the oil clean for even frying.
6. Tonkatsu Sauce: The Perfect Pairing
Tonkatsu sauce is a must-have condiment for Chicken Katsu, balancing sweet, tangy, and umami flavors. While store-bought versions are widely available, a homemade sauce can elevate the dish:
- Key Ingredients – Worcestershire sauce, soy sauce, ketchup, sugar, and mustard.
- Homemade Alternative – Some versions add grated apple or mirin for a slight sweetness.
7. Side Dishes & Garnishes
Chicken Katsu is traditionally served with:
- Steamed White Rice – A fluffy bed of Japanese short-grain rice complements the crispy cutlet.
- Shredded Cabbage – Provides a refreshing crunch to balance the richness of the fried chicken.
- Japanese Pickles (Tsukemono) – Adds a touch of acidity and contrast in flavor.
- Miso Soup – A classic side that rounds out a Japanese meal.
By using these authentic ingredients and proper techniques, you can create a restaurant-quality Chicken Katsu in your own kitchen. Would you like a step-by-step recipe section to complement this? 😊

2. Essential Ingredients for the Perfect Chicken Katsu
Creating the perfect Chicken Katsu starts with choosing the right ingredients. Each component plays a crucial role in achieving the crispy, golden crust and tender, juicy chicken that make this dish so irresistible. From selecting the best cut of chicken to using authentic Japanese panko breadcrumbs, every detail contributes to the flavor and texture of your katsu.
In this section, we’ll break down the key ingredients, including the best type of chicken, seasonings, coating process, and oil for frying. Whether you’re making a classic deep-fried katsu or a lighter air-fried version, these ingredients will ensure your cutlet turns out perfectly every time!
-Choosing the Right Chicken: Breast vs. Thigh – Which One is Better?
When making Chicken Katsu, the choice between chicken breast and chicken thigh plays a major role in the final texture, flavor, and juiciness of the dish. Both cuts have their pros and cons, and the best option depends on personal preference and cooking style. Let’s break down the differences:
1. Chicken Breast: Lean and Classic Choice
Pros:
✔️ Lean and high in protein – Ideal for those looking for a healthier option.
✔️ Firm texture – Holds its shape well, making it easy to slice after frying.
✔️ Mild flavor – A great base for absorbing seasonings and sauces.
Cons:
❌ Can be dry if overcooked – Since it’s a lean cut, it’s prone to drying out.
❌ Less forgiving – Requires careful cooking to maintain moisture.
Best For:
- Traditional Japanese Chicken Katsu recipes.
- Those who prefer a firmer, less fatty texture.
- Air-fried or baked katsu, where excess fat isn’t needed.
2. Chicken Thigh: Juicy and Flavorful Choice
Pros:
✔️ More tender and juicy – The higher fat content helps keep the meat moist.
✔️ Rich, deep flavor – Naturally more flavorful compared to chicken breast.
✔️ Harder to overcook – The fat content prevents it from drying out easily.
Cons:
❌ Higher fat content – Not ideal for those looking for a leaner option.
❌ Less uniform shape – Can be uneven, requiring extra trimming for even frying.
Best For:
- More indulgent Chicken Katsu with extra juiciness.
- Those who prefer a richer, more tender texture.
- Deep-fried versions, where fat contributes to extra crispiness.
Which One is Better?
There’s no right or wrong choice—it depends on your texture preference and dietary goals:
- Choose chicken breast for a lean, classic katsu with a firmer texture.
- Choose chicken thigh for a juicier, more flavorful cutlet that’s harder to overcook.
For the best of both worlds, some chefs butterfly chicken breast to create a thinner cutlet that cooks more evenly, retaining moisture while still providing a leaner texture. No matter which you choose, using high-quality chicken and proper frying techniques will ensure a crispy, delicious Chicken Katsu every time!
-The Perfect Crispy Coating: Flour, Eggs, and Panko Breadcrumbs
One of the key elements that make Chicken Katsu so delicious is its light, crispy, and golden-brown coating. The secret lies in the three-step breading process using flour, eggs, and panko breadcrumbs, which work together to create a crunchy texture while keeping the chicken moist and tender inside. Let’s break down each component and its role in achieving the perfect crispy coating.
1. Flour: The Foundation of the Coating
The first step in breading Chicken Katsu is to dredge the chicken in flour. This step is crucial because it:
✅ Creates a dry surface for the egg wash to stick to.
✅ Helps bind the breadcrumbs for even coating.
✅ Seals in moisture, preventing the chicken from drying out during frying.
Types of Flour to Use:
- All-Purpose Flour – The most common choice, providing a smooth and light base.
- Rice Flour – A great alternative for a gluten-free option that still achieves crispiness.
- Seasoned Flour – Adding salt, pepper, or a touch of garlic powder can enhance the flavor.
💡 Pro Tip: Lightly shake off excess flour to avoid a thick or doughy coating.
2. Eggs: The Essential Binding Agent
After coating in flour, the next step is to dip the chicken into beaten eggs. The egg wash acts as a glue that helps the panko breadcrumbs adhere properly.
How to Make the Perfect Egg Wash:
- Whisk 1–2 eggs thoroughly for an even consistency.
- Optional: Add a splash of milk or water to lighten the texture.
- Seasoning Tip: A few drops of soy sauce or a pinch of salt can add extra depth of flavor.
💡 Pro Tip: Ensure the chicken is fully coated in egg but not dripping excessively before moving to the breadcrumb stage.
3. Panko Breadcrumbs: The Secret to a Crispy, Flaky Coating
The final and most important step is coating the chicken with panko breadcrumbs. Unlike regular breadcrumbs, panko is lighter, larger, and airier, resulting in an extra crispy texture that stays crunchy longer.
Why Panko Breadcrumbs Are the Best Choice:
✅ Lighter texture – Absorbs less oil, keeping the coating crisp.
✅ Bigger flakes – Creates a more defined crunch compared to fine breadcrumbs.
✅ Authentic Japanese Style – Used in traditional Tonkatsu and Katsu dishes for a signature crisp.
💡 Pro Tips for Maximum Crispiness:
- Press the breadcrumbs gently onto the chicken to ensure full coverage.
- Use fresh panko for the best texture – homemade panko from crushed Japanese bread works even better.
- For extra crispiness, let the breaded chicken rest for 5–10 minutes before frying to help the coating set.
Bonus: Alternative Coatings for a Unique Twist
While traditional panko breadcrumbs are the best for Chicken Katsu, you can experiment with different coatings for a fun twist:
- Cornflakes – For a crunchier, slightly sweeter texture.
- Tempura Batter – A Japanese-style variation with a lighter, airy crisp.
- Crushed Crackers or Chips – Adds a unique, bold flavor to the coating.
By mastering the flour, egg, and panko process, you can achieve a perfectly crispy, golden-brown Chicken Katsu every time! 🍽️🔥
-Seasoning Secrets: Garlic, Ginger, Soy Sauce, and Mirin for Enhanced Flavor
While traditional Chicken Katsu is known for its crispy texture and mild flavor, seasoning the chicken before breading can take it to the next level. A simple yet effective blend of garlic, ginger, soy sauce, and mirin infuses the meat with depth, umami, and a hint of sweetness, ensuring that every bite is flavorful even before the crispy coating is added.
1. Garlic: A Bold, Savory Kick
- Fresh grated or minced garlic adds a robust, savory depth to the chicken.
- Garlic powder is an easy alternative that evenly distributes flavor.
- A quick garlic marinade enhances the umami notes in the chicken.
2. Ginger: A Subtle, Peppery Warmth
- Freshly grated ginger adds a mild heat and aromatic freshness.
- Ginger helps tenderize the chicken by breaking down proteins, making it juicier.
- A small amount of ginger powder works as a substitute for fresh ginger.
3. Soy Sauce: The Ultimate Umami Booster
- Light soy sauce adds a savory, slightly salty depth to the chicken.
- A quick marinade of soy sauce before breading ensures the meat is well-seasoned.
- Soy sauce balances the natural sweetness of mirin, creating a harmonious flavor profile.
4. Mirin: A Touch of Sweetness
- Mirin, a sweet Japanese rice wine, enhances flavor without overpowering.
- It helps create a mild caramelization on the chicken when fried.
- Mirin balances the saltiness of soy sauce and the sharpness of garlic and ginger.
How to Use These Seasonings for Maximum Flavor
To infuse the chicken with these flavors, try one of these methods:
- Simple Marinade (15-30 minutes before cooking)
- Mix soy sauce (2 tbsp), mirin (1 tbsp), grated garlic (1 clove), and grated ginger (1 tsp).
- Coat the chicken and let it marinate before proceeding with breading.
- Season the Chicken Directly
- If skipping the marinade, rub the chicken with salt, pepper, garlic powder, and ginger powder before dredging in flour and egg.
- Infuse the Egg Wash
- Add a few drops of soy sauce and a pinch of garlic and ginger powder to the beaten eggs for extra flavor.
Using these seasoning secrets ensures that your Chicken Katsu is not just crispy on the outside but also flavorful and juicy inside—making it taste even better with or without sauce!
-Oil for Frying: Best Oils to Get That Golden Crunch
Choosing the right oil is crucial when making Chicken Katsu, as it directly affects the texture, flavor, and crispiness of the cutlet. The best frying oil should have a high smoke point, a neutral flavor, and the ability to maintain a steady temperature for even cooking. Here’s a guide to the best oils for achieving that golden-brown, ultra-crispy crust while keeping the chicken juicy inside.
1. Best Oils for Deep-Frying Chicken Katsu
When deep-frying Chicken Katsu, you need an oil that can handle high temperatures (between 325–350°F / 163–177°C). Here are some of the best options:
- Vegetable Oil – A commonly used, affordable option with a high smoke point (~400°F / 204°C) that works well for deep-frying.
- Canola Oil – One of the best choices due to its neutral taste, affordability, and high smoke point (~400°F / 204°C).
- Peanut Oil – Known for producing a crispier and lighter texture, peanut oil has a high smoke point (~450°F / 232°C) and enhances the crunch factor.
- Sunflower Oil – A clean, neutral-flavored oil with a high smoke point (~440°F / 227°C), making it ideal for frying katsu.
- Rice Bran Oil – A traditional choice in Japanese cooking, rice bran oil has a high smoke point (~450°F / 232°C) and adds a slightly nutty depth to the flavor.
2. Oils to Avoid for Frying Chicken Katsu
Some oils are not ideal for deep-frying due to their low smoke points or overpowering flavors:
- Olive Oil (Extra Virgin) – Burns at lower temperatures and has a strong, distinct flavor that doesn’t complement Chicken Katsu.
- Sesame Oil – While commonly used in Asian cuisine, sesame oil has a low smoke point and is better suited for seasoning or finishing a dish.
- Butter or Margarine – These contain milk solids, which burn quickly and don’t provide the clean, crisp fry that katsu needs.
3. Tips for Proper Frying & Oil Maintenance
To achieve perfectly crispy Chicken Katsu, follow these frying tips:
- Use a thermometer – Maintain an oil temperature between 325–350°F (163–177°C) for the best crispiness. If the oil is too cold, the chicken absorbs too much oil and becomes greasy; if too hot, the panko burns before the chicken cooks through.
- Don’t overcrowd the pan – Fry in small batches to keep the oil temperature stable and allow the cutlets to cook evenly.
- Skim the oil – Remove burnt panko crumbs between batches to prevent them from sticking to fresh cutlets and giving a bitter taste.
- Drain properly – After frying, place the cutlets on a wire rack instead of paper towels to keep them crispy and avoid oil buildup.
4. Can You Use an Air Fryer or Bake Chicken Katsu Instead?
For a healthier alternative, you can cook Chicken Katsu in an air fryer or oven:
- Air Fryer Method: Lightly spray the breaded cutlet with oil and cook at 375°F (190°C) for 12-15 minutes, flipping halfway through.
- Oven-Baked Method: Bake at 400°F (200°C) for 20-25 minutes, spraying with oil for a crispier texture.
Using the right oil and proper frying techniques will help you achieve crispy, golden-brown Chicken Katsu every time!

3. How to Cook Chicken Katsu: Step-by-Step Guide
Making Chicken Katsu at home is easier than you think! With the right technique, you can achieve a crispy, golden-brown crust and tender, juicy chicken every time. Whether you choose the traditional deep-frying method, a healthier air-fryer version, or a baked alternative, the key lies in proper breading, frying temperature, and seasoning.
In this step-by-step guide, we’ll walk you through the essential techniques to prepare, coat, and cook Chicken Katsu to perfection. Follow along to master this Japanese comfort dish and bring restaurant-quality katsu to your home kitchen!
-Traditional Deep-Frying Method for Ultra-Crispy Katsu
Deep-frying is the most authentic and effective way to achieve ultra-crispy Chicken Katsu, giving it a golden-brown crust while keeping the inside juicy and tender. The key to perfect Japanese-style deep-fried katsu lies in maintaining the right oil temperature, using high-quality panko breadcrumbs, and following a proper breading technique.
Here’s a detailed step-by-step guide to mastering the traditional deep-frying method:
1. Preparing the Chicken
Before frying, it’s essential to prepare the chicken properly to ensure even cooking and the right texture.
- Choose the Right Cut – Use boneless, skinless chicken breast for a leaner texture or chicken thigh for extra juiciness.
- Flatten the Chicken (Optional) – Pound the chicken lightly with a mallet or rolling pin to achieve even thickness (about ½ inch thick), ensuring it cooks evenly.
- Season Generously – Lightly season both sides of the chicken with salt, black pepper, and optional garlic powder for enhanced flavor.
2. Setting Up the Breading Station
A proper three-step breading process ensures a crispy and well-adhered coating:
- Flour Coating – Dredge the chicken in all-purpose flour (or rice flour for extra crispiness) to absorb moisture and help the egg stick.
- Egg Wash – Dip the floured chicken into a beaten egg mixture, ensuring full coverage.
- Panko Breadcrumbs – Press the chicken firmly into Japanese panko breadcrumbs, making sure it’s evenly coated. Do not press too hard, as the breadcrumbs should stay light and airy for better crispiness.
💡 Pro Tip: Let the breaded chicken rest for 5–10 minutes before frying. This helps the coating adhere better and prevents it from falling off during frying.
3. Choosing the Right Oil & Frying Temperature
Deep-frying requires an oil that has a high smoke point and a neutral flavor to avoid overpowering the chicken. Some of the best oils for deep-frying Chicken Katsu include:
- Canola Oil
- Vegetable Oil
- Peanut Oil
- Sunflower Oil
- Rice Bran Oil (traditional Japanese option)
🔥 Optimal Frying Temperature: 325–350°F (163–177°C)
- If the oil is too hot, the breadcrumbs will burn before the chicken cooks through.
- If the oil is too cold, the chicken will absorb too much oil and become greasy instead of crispy.
💡 Pro Tip: Use a kitchen thermometer to monitor the oil temperature. If you don’t have one, drop a small panko breadcrumb into the oil—if it sizzles and rises to the top immediately without burning, the oil is ready!
4. Frying the Chicken to Perfection
- Gently place the breaded chicken into the hot oil, frying one or two pieces at a time to maintain oil temperature.
- Fry for 3–4 minutes per side, until the chicken turns golden brown and crispy.
- Use tongs or chopsticks to flip the chicken only once to avoid disturbing the crispy coating.
💡 Pro Tip: Avoid constantly moving the chicken while frying—let it develop a beautiful, even crust.
5. Draining & Resting the Fried Chicken
- Remove the fried chicken from the oil and place it on a wire rack or paper towel-lined plate to drain excess oil.
- Let it rest for a few minutes before slicing—this helps retain juiciness and keeps the crust from getting soggy.
- Slice into bite-sized strips and serve immediately with tonkatsu sauce, steamed rice, and shredded cabbage.
💡 Pro Tip: Avoid placing fried chicken directly on paper towels for too long, as the steam buildup underneath can soften the crispy crust. A wire rack is the best option!
6. Serving Suggestions
Deep-fried Chicken Katsu pairs perfectly with:
🍚 Steamed Japanese Rice – A fluffy base to balance the crunchy katsu.
🥬 Shredded Cabbage – Adds a refreshing crunch and pairs well with tonkatsu sauce.
🍶 Tonkatsu Sauce – The signature sweet and tangy sauce that enhances the flavor.
🥢 Pickled Vegetables or Miso Soup – Traditional Japanese sides that complete the meal.
Final Tips for Extra Crispy Chicken Katsu
✔ Use Japanese panko breadcrumbs instead of regular breadcrumbs for a lighter, crispier texture.
✔ Double-fry method: If you want extra crispiness, fry once at 320°F (160°C), let it rest for 5 minutes, then fry again at 350°F (177°C) for 1–2 minutes.
✔ Don’t overcrowd the pan, as it lowers the oil temperature and makes the katsu greasy instead of crispy.
✔ Slice with a sharp knife to prevent crushing the crispy coating.
By following this traditional deep-frying method, you’ll achieve restaurant-quality Chicken Katsu with a beautifully crispy exterior and a tender, juicy inside.
-Healthier Alternatives: Air Fryer and Oven-Baked Katsu Options
If you love the crispy texture of Chicken Katsu but want a healthier alternative to deep-frying, air-frying and oven-baking are excellent options. These methods significantly reduce the amount of oil and calories while still delivering a deliciously crunchy exterior and juicy chicken inside. Below, we’ll explore both techniques and share tips to get the best results.
1. Air Fryer Chicken Katsu: Crispy with Less Oil
Air fryers have become a popular way to enjoy crispy foods with minimal oil, making them an ideal choice for healthier Chicken Katsu. Instead of deep-frying, the air fryer circulates hot air around the breaded cutlet, creating a golden, crunchy crust without submerging it in oil.
How to Make Air Fryer Chicken Katsu:
Ingredients:
- 2 boneless, skinless chicken breasts (pounded to even thickness)
- ½ cup all-purpose flour
- 1 large egg (beaten)
- 1 cup panko breadcrumbs (lightly toasted for extra crunch)
- 1 tsp salt & ½ tsp black pepper
- 1 tsp garlic powder (optional)
- Cooking spray or a light drizzle of oil
Instructions:
- Preheat the air fryer to 375°F (190°C) for about 5 minutes.
- Prepare the breading station:
- Dredge the chicken in flour, shaking off excess.
- Dip it in the beaten egg to coat evenly.
- Press it into the panko breadcrumbs, ensuring a thick, even layer.
- Lightly spray both sides of the breaded chicken with cooking spray or brush with oil to help crisp up the coating.
- Place the chicken in the air fryer basket in a single layer (do not overcrowd).
- Air fry at 375°F (190°C) for 12-15 minutes, flipping halfway through, until golden brown and cooked through (internal temperature: 165°F / 75°C).
- Serve immediately with steamed rice, shredded cabbage, and tonkatsu sauce.
Tips for the Best Air Fryer Katsu:
✔ Toast panko breadcrumbs beforehand in a dry pan for extra crispiness.
✔ Use a light spray of oil for a more even, golden crust.
✔ Flip halfway through cooking for an evenly crispy texture.
✔ Avoid overcrowding the air fryer basket to allow for proper air circulation.
2. Oven-Baked Chicken Katsu: A Crispy and Guilt-Free Option
Oven-baking is another healthy alternative to deep-frying, allowing you to cook multiple pieces at once without excessive oil. While it takes a bit longer than air-frying, it still results in crispy, golden chicken when done correctly.
How to Make Oven-Baked Chicken Katsu:
Ingredients:
(Same as the air fryer method)
Instructions:
- Preheat the oven to 400°F (200°C).
- Prepare the breading station (flour, egg wash, and panko).
- Toast the panko breadcrumbs in a dry pan for extra crunch.
- Lightly coat a baking sheet with oil or line it with parchment paper.
- Place the breaded chicken on the baking sheet and lightly drizzle or spray oil over the top.
- Bake for 20-25 minutes, flipping halfway through, until golden and crispy.
- Check for doneness (internal temp: 165°F / 75°C), then serve with your favorite sides.
Tips for the Best Oven-Baked Katsu:
✔ Use a wire rack over a baking sheet to allow air circulation and crisp up both sides evenly.
✔ Pre-toast the panko breadcrumbs in a pan for a deep-fried-like texture.
✔ Brush or spray a small amount of oil onto the breading for an even golden finish.
✔ Broil for the last 2-3 minutes for extra crispiness.
Which Healthy Cooking Method is Best?
| Method | Crunch Factor | Cooking Time | Oil Needed | Ease of Cooking |
|---|---|---|---|---|
| Air Fryer | Very Crispy | 12-15 minutes | Minimal spray | Quick & Convenient |
| Oven-Baked | Moderately Crispy | 20-25 minutes | Light drizzle | Cooks multiple pieces |
| Deep-Fried | Extra Crispy | 5-8 minutes | Full submersion | Traditional method |
Both the air fryer and oven-baked methods offer a healthier alternative to deep-fried katsu while still delivering great flavor and texture. If you want maximum crispiness, the air fryer is your best bet. However, if you’re cooking for a group, oven-baking allows you to prepare multiple cutlets at once.
Regardless of the method you choose, you’ll still enjoy a deliciously crispy Chicken Katsu—just with fewer calories and less guilt! 😊
-Common Mistakes to Avoid: Soggy Breading, Underseasoned Chicken, Overcooking
Cooking Chicken Katsu may seem simple, but small mistakes can affect the texture, flavor, and overall quality of the dish. To achieve a crispy, golden-brown crust and juicy, flavorful chicken, it’s essential to avoid these common pitfalls. Here’s how to perfect your technique and prevent the most frequent mistakes:
1. Soggy Breading: Why It Happens and How to Prevent It
A crispy and crunchy coating is one of the defining features of Chicken Katsu. However, many home cooks end up with soggy breading that falls apart. Here’s what might be going wrong:
Causes of Soggy Breading:
✅ Skipping the resting time – After breading the chicken, it’s crucial to let it rest for at least 5–10 minutes before frying. This helps the panko adhere better and prevents the coating from falling off in the oil.
✅ Not using panko breadcrumbs – Regular breadcrumbs absorb too much oil and won’t give you the signature crispness of Chicken Katsu. Always use Japanese panko breadcrumbs for the best results.
✅ Frying at the wrong temperature – If the oil is too cold (below 325°F / 163°C), the breadcrumbs absorb too much oil, making them greasy instead of crispy. If it’s too hot, the outside burns before the inside is fully cooked. Maintain an oil temperature of 325–350°F (163–177°C) for perfect frying.
✅ Overcrowding the pan – Frying too many pieces at once lowers the oil temperature, leading to uneven cooking and a soft crust. Fry in small batches for the best results.
✅ Placing fried katsu on paper towels – While paper towels absorb excess oil, they also trap steam, making the breading soggy. Instead, drain the katsu on a wire rack to keep it crispy.
2. Underseasoned Chicken: How to Boost Flavor
A crispy crust is important, but if the chicken itself lacks flavor, the dish won’t be satisfying. Here’s how to ensure every bite is well-seasoned and delicious:
Causes of Bland Chicken:
✅ Not seasoning the chicken directly – Many home cooks rely on the sauce for flavor, but seasoning the chicken before breading is essential. Use salt, black pepper, and optionally garlic powder or soy sauce to enhance the taste.
✅ Skipping a quick marinade – For deeper flavor, let the chicken sit in a light marinade of soy sauce, mirin, and garlic for 15–30 minutes before breading. This adds an extra umami boost.
✅ Not seasoning the flour or egg wash – Adding a pinch of salt and black pepper to the flour and egg wash helps distribute flavor throughout the breading, preventing bland bites.
3. Overcooking: Keeping the Chicken Juicy and Tender
Chicken Katsu should be crispy on the outside and juicy on the inside. Overcooking leads to dry, tough chicken that lacks the tenderness of a perfect cutlet.
Causes of Overcooked Chicken:
✅ Frying at too high a temperature – If the oil is too hot (above 350°F / 177°C), the outside browns too quickly while the inside remains undercooked. Keep the oil at a steady 325–350°F (163–177°C) for even cooking.
✅ Using chicken that’s too thick – Thick chicken breasts take longer to cook and may result in burnt breading with raw meat inside. For best results, pound the chicken to an even ½-inch thickness before breading.
✅ Overcooking in the oven or air fryer – If using these methods, avoid cooking at high temperatures for too long. For an air fryer, cook at 375°F (190°C) for 12-15 minutes, flipping halfway. For oven-baked katsu, bake at 400°F (200°C) for 20-25 minutes, checking for doneness at the 20-minute mark.
✅ Not resting the chicken after frying – Cutting into the katsu immediately causes the juices to escape, making the chicken drier. Let the cooked cutlet rest for 5 minutes before slicing to retain moisture.
Final Tips for the Perfect Chicken Katsu
✅ Use Japanese panko breadcrumbs for the crispiest crust.
✅ Maintain an oil temperature of 325–350°F (163–177°C) for even frying.
✅ Season the chicken before breading to enhance flavor.
✅ Let the breaded chicken rest before frying for better adhesion.
✅ Drain on a wire rack instead of paper towels to keep it crispy.
✅ Let the katsu rest before slicing to retain juiciness.
By avoiding these common mistakes, you’ll ensure your Chicken Katsu turns out crispy, flavorful, and perfectly cooked every time!

4. Chicken Katsu Variations & Creative Serving Ideas
While the classic Chicken Katsu served with rice and tonkatsu sauce is undeniably delicious, there are many exciting ways to enjoy this crispy Japanese cutlet. From fusion dishes to unique presentations, Chicken Katsu can be transformed into a variety of meals that suit different tastes and occasions.
In this section, we’ll explore creative serving ideas, including Chicken Katsu Curry, Katsu Sando (Japanese sandwich), Katsu Donburi (rice bowl), and even ramen pairings. Whether you’re looking for a traditional approach or a modern twist, these ideas will help you take your Chicken Katsu to the next level!
-Chicken Katsu Curry: Serving Katsu with Rich Japanese Curry
One of the most beloved variations of Chicken Katsu is Chicken Katsu Curry (チキンカツカレー), a hearty and flavorful dish that combines crispy katsu with thick, aromatic Japanese curry. This dish is a staple in Japanese comfort food, offering a perfect balance of crunchy texture, rich umami flavors, and comforting warmth.
1. What Makes Japanese Curry Different?
Unlike Indian or Thai curry, Japanese curry is thicker, milder, and slightly sweet, with a rich, velvety texture. The base flavors come from a blend of:
✅ Curry roux – A pre-made curry block or a homemade mix of flour, butter, and spices like turmeric, cumin, and garam masala.
✅ Aromatics – Onion, garlic, and ginger are slowly cooked to enhance depth of flavor.
✅ Vegetables – Potatoes, carrots, and sometimes apples add a slight sweetness and heartiness to the dish.
✅ Broth or stock – Typically made with chicken or beef stock for a deep, umami-packed taste.
2. How to Serve Chicken Katsu with Japanese Curry
To create Chicken Katsu Curry, follow these simple steps:
Step 1: Make the Japanese Curry
1️⃣ Sauté onions, garlic, and ginger in a pot until golden brown.
2️⃣ Add carrots and potatoes, cooking for a few minutes.
3️⃣ Pour in chicken or vegetable broth and let it simmer until the vegetables are tender.
4️⃣ Stir in Japanese curry roux (store-bought or homemade) and let it thicken into a rich, savory sauce.
Step 2: Prepare the Chicken Katsu
1️⃣ Follow the traditional method to bread and fry the Chicken Katsu using panko breadcrumbs for a crispy crust.
2️⃣ Let the katsu rest for a few minutes, then slice it into strips.
Step 3: Assemble the Dish
1️⃣ Place a generous serving of steamed white rice on a plate.
2️⃣ Ladle the thick Japanese curry sauce next to or over the rice.
3️⃣ Arrange the crispy Chicken Katsu on top.
4️⃣ Garnish with pickled red ginger (beni shoga), green onions, or a sprinkle of sesame seeds for added flavor.
3. Customizing Chicken Katsu Curry
For a unique twist, try these variations:
🔥 Spicy Katsu Curry – Add extra curry powder, chili flakes, or S&B spicy curry roux for a bolder flavor.
🍏 Sweet Apple Curry – Grate Fuji or Honeycrisp apples into the curry for a natural sweetness.
🍛 Cheese Katsu Curry – Top your Chicken Katsu with a slice of melted cheese for an indulgent fusion.
🌱 Vegetarian Katsu Curry – Swap the chicken for breaded tofu or eggplant katsu while keeping the curry sauce.
4. Why You’ll Love Chicken Katsu Curry
✔️ Rich and satisfying – A perfect balance of crispy, savory, and creamy flavors.
✔️ Easily customizable – Adjust spice levels, sweetness, or toppings to your taste.
✔️ Great for meal prep – Japanese curry tastes even better the next day, making it a convenient make-ahead meal.
Final Thoughts
Chicken Katsu Curry is a must-try for anyone who loves Japanese cuisine. With its crispy cutlet and velvety curry sauce, it’s a dish that brings comfort, warmth, and bold flavors to the table. Try it with different side dishes like miso soup, pickles, or a fresh salad for a complete, restaurant-quality meal at home!
-Katsu Donburi: Chicken Katsu Served Over a Rice Bowl with Eggs
Katsu Donburi (カツ丼), commonly known as Katsu Don, is a hearty and flavorful Japanese rice bowl that combines crispy Chicken Katsu with a savory-sweet dashi-based egg sauce, all served over a bed of warm steamed rice. This dish is a perfect balance of crispy and tender textures, infused with rich umami flavors, making it a popular comfort food in Japan.
1. What Makes Katsu Donburi Special?
Unlike regular Chicken Katsu, which is served separately with tonkatsu sauce, Katsu Don takes the dish to another level by simmering the crispy cutlet in a mixture of soy sauce, mirin, dashi broth, sugar, and onions, then gently adding beaten eggs to create a flavorful, silky coating over the cutlet. This umami-packed sauce soaks slightly into the rice, enhancing every bite with deep, savory notes.
2. Essential Ingredients for Katsu Donburi
To make a perfect Katsu Donburi, you’ll need:
✅ Chicken Katsu – A crispy, golden-brown cutlet, prepared with panko breadcrumbs, flour, and egg wash, fried to perfection.
✅ Steamed White Rice – Japanese short-grain rice, fluffy and slightly sticky, which absorbs the flavorful sauce beautifully.
✅ Onion – Sliced thinly and cooked until tender, adding natural sweetness.
✅ Eggs – Lightly beaten and gently poured over the simmering sauce and chicken for a soft, silky texture.
✅ Dashi Broth – The base of the sauce, made from kombu (seaweed) and bonito flakes, giving the dish a deep umami flavor.
✅ Soy Sauce & Mirin – These provide a balanced salty-sweet taste, essential for authentic donburi sauce.
✅ Sugar – Adds a touch of sweetness to balance the soy sauce.
✅ Green Onions & Mitsuba (Japanese Parsley) – Used as a garnish for a fresh contrast in flavor.
3. How to Make Katsu Donburi: Step-by-Step
1️⃣ Prepare the Chicken Katsu – Follow the traditional Chicken Katsu recipe, ensuring it is crispy and golden. Slice into bite-sized strips.
2️⃣ Cook the Onion and Sauce – In a pan, heat dashi broth, soy sauce, mirin, and sugar, then add sliced onions. Simmer until onions are soft.
3️⃣ Add the Katsu and Eggs – Place the sliced Chicken Katsu into the pan. Slowly pour the beaten eggs over the top, covering the cutlet and onions. Let it cook until the eggs are just set but still slightly runny.
4️⃣ Serve Over Rice – Spoon the Chicken Katsu and egg mixture over a bowl of steamed rice.
5️⃣ Garnish and Enjoy – Top with green onions or mitsuba, and serve immediately for the best texture and flavor.
4. Variations of Katsu Donburi
🔥 Spicy Katsu Don – Add a dash of shichimi togarashi (Japanese chili spice blend) for an extra kick.
🍛 Katsu Don with Cheese – Melted cheese on top of the eggs adds a creamy, indulgent twist.
🌿 Healthy Katsu Don – Use baked or air-fried Chicken Katsu for a lighter version.
🍚 Extra Crispy Katsu Don – For those who prefer maximum crunch, serve the Chicken Katsu separately and pour the sauce over the rice only.
5. Why You Should Try Katsu Donburi
✔ One-bowl meal – Everything is served in one bowl, making it an easy and satisfying dish.
✔ Sweet and savory flavor – The combination of crispy chicken, silky egg, and umami-rich sauce creates an irresistible taste.
✔ Quick and easy to prepare – With pre-made Chicken Katsu, Katsu Don can be made in under 15 minutes.
✔ Perfect comfort food – Warm, flavorful, and filling—ideal for a cozy meal at home.
Katsu Donburi is a must-try variation for Chicken Katsu lovers, offering a rich and comforting twist on the classic cutlet. Whether you enjoy it traditional-style or with your own creative spin, this dish is sure to become a favorite in your home kitchen! 🍛🥢
Katsu Sando (Japanese Sandwich): A Crispy Cutlet Between Soft Milk Bread
The Katsu Sando is a beloved Japanese sandwich that combines the crispy crunch of Chicken Katsu with the soft, fluffy texture of shokupan (Japanese milk bread). It’s a simple yet incredibly satisfying dish, known for its perfect balance of textures and flavors. Often found in Japanese cafés, convenience stores, and specialty restaurants, the Katsu Sando is a portable, easy-to-eat meal that showcases the versatility of Chicken Katsu.
1. Key Ingredients for the Perfect Katsu Sando
To create an authentic and delicious Katsu Sando, it’s important to use the right ingredients:
✅ Chicken Katsu – A crispy, golden-brown cutlet, usually made from pounded chicken breast or thigh, coated in panko breadcrumbs and fried to perfection.
✅ Shokupan (Japanese Milk Bread) – This soft, fluffy, slightly sweet bread is key to a true Katsu Sando experience. It has a pillowy texture that complements the crunchy katsu. If unavailable, brioche or white sandwich bread can be used as substitutes.
✅ Tonkatsu Sauce – A rich, sweet-savory sauce made from Worcestershire sauce, soy sauce, ketchup, and sugar. This adds depth and moisture to the sandwich.
✅ Japanese Mustard (Karashi) or Mayo – Some variations include spicy karashi mustard or creamy Japanese mayo, enhancing the flavor profile.
✅ Butter – Lightly spreading butter on the bread adds an extra layer of richness.
2. How to Assemble a Perfect Katsu Sando
Follow these easy steps to make a Katsu Sando at home:
1️⃣ Prepare the Chicken Katsu – Cook a crispy panko-breaded Chicken Katsu cutlet, ensuring it’s golden brown and perfectly crispy. Let it rest for a few minutes before slicing.
2️⃣ Toast or Butter the Shokupan – Some prefer lightly toasting the bread for added texture, while others keep it soft. Spreading butter or Japanese mayo enhances the flavor.
3️⃣ Add Tonkatsu Sauce – Generously drizzle or spread tonkatsu sauce over the katsu cutlet. This is key to achieving the signature sweet-savory taste of a Katsu Sando.
4️⃣ Assemble the Sandwich – Place the Chicken Katsu between two slices of milk bread, ensuring the sauce is evenly distributed. Some versions also add a thin layer of finely shredded cabbage for extra crunch.
5️⃣ Trim the Crust & Slice – For an authentic Japanese-style presentation, trim the crusts off and cut the sandwich into neat halves or thirds.
3. Katsu Sando Variations & Creative Twists
While the classic Katsu Sando is simple and delicious, there are several creative variations to try:
✅ Cheese Katsu Sando – Melted cheese-stuffed Chicken Katsu takes this sandwich to the next level!
✅ Spicy Katsu Sando – Add spicy mayo, sriracha, or karashi mustard for a fiery kick.
✅ Egg Katsu Sando – Some variations include a soft-boiled or fried egg for extra richness.
✅ Teriyaki Katsu Sando – Swap out tonkatsu sauce for teriyaki glaze for a sweeter, umami-packed sandwich.
✅ Vegetable Katsu Sando – A vegetarian version using tofu or eggplant katsu instead of chicken.
4. Where to Find Katsu Sando & Best Pairings
Katsu Sando is a popular dish in Japan, found in konbini (convenience stores), specialty cafés, and bento shops. In recent years, it has also gained popularity in Western countries, with gourmet restaurants and food trucks offering elevated versions.
For the best experience, enjoy a Katsu Sando with:
🍵 Green tea or iced matcha latte – A refreshing contrast to the rich katsu.
🥗 Pickled vegetables or miso soup – Traditional sides that balance the flavors.
🥔 Potato chips or fries – A fun fusion twist for a heartier meal.
Final Thoughts: Why Katsu Sando is a Must-Try
The Katsu Sando is proof that simple ingredients, when combined correctly, create an incredibly satisfying dish. Whether you make it at home or try it at a Japanese café, this sandwich delivers the perfect balance of crunch, softness, and umami flavors in every bite.
-Chicken Katsu Ramen: Adding a Crispy Cutlet to a Bowl of Flavorful Ramen
If you love the crispy crunch of Chicken Katsu and the rich, comforting warmth of ramen, why not combine them into one hearty, flavorful dish? Chicken Katsu Ramen is a creative fusion that pairs deep-fried panko-breaded chicken with a savory, umami-packed ramen broth, offering the perfect balance of textures and flavors.
1. Why Chicken Katsu Works with Ramen
Chicken Katsu adds a crispy, golden crunch to the soft, slurp-worthy noodles of ramen. The crispy coating soaks up just enough broth to become flavorful while still maintaining its texture, making every bite a delicious contrast of crispy, chewy, and tender textures.
The juicy chicken also brings a mild, savory flavor that complements the deep richness of ramen broth, creating a satisfying and indulgent meal.
2. Best Types of Ramen to Pair with Chicken Katsu
Not all ramen styles work equally well with Chicken Katsu. Here are some of the best pairings to maximize flavor and texture:
🍜 Tonkotsu Ramen (Pork Bone Broth)
- A rich, creamy, and deeply flavorful broth that coats the Chicken Katsu perfectly.
- The deep-fried chicken contrasts beautifully with the silky, collagen-rich broth.
🍜 Shoyu Ramen (Soy Sauce Broth)
- A lighter, yet umami-packed soy sauce-based broth that complements the savory breading of Chicken Katsu.
- Works well with added green onions, bamboo shoots, and a soft-boiled egg.
🍜 Miso Ramen (Fermented Soybean Broth)
- The nutty, slightly sweet miso broth enhances the crispy chicken’s richness.
- Best with toppings like corn, butter, and sesame seeds for a comforting meal.
🍜 Spicy Ramen (Tantanmen or Spicy Miso Broth)
- If you love a kick of heat, spicy miso ramen or Tantanmen (spicy sesame ramen) is an amazing match.
- The heat cuts through the richness of the fried cutlet, balancing the dish.
3. How to Serve Chicken Katsu Ramen
To create the perfect Chicken Katsu Ramen, follow these plating tips:
✅ Cook the ramen noodles separately – This prevents them from absorbing too much broth before serving.
✅ Slice the Chicken Katsu just before serving – To keep the crispy coating intact, cut the katsu right before placing it on top of the ramen.
✅ Place the Chicken Katsu on the side or half-submerged – This allows diners to enjoy both crispy and slightly soaked textures.
✅ Top with fresh garnishes – Add ingredients like soft-boiled eggs, green onions, sesame seeds, nori (seaweed), and chili oil for extra depth.
4. Customizing Your Chicken Katsu Ramen
Make your Chicken Katsu Ramen even more special by adding these elements:
🔥 Spicy Kick – Add chili oil, Sriracha, or spicy miso paste for an extra heat boost.
🥚 Extra Protein – Include a soft-boiled ramen egg (ajitsuke tamago) or a sprinkle of sesame-crusted tofu.
🥬 Healthy Additions – Toss in some bok choy, mushrooms, or shredded cabbage for added texture and nutrients.
🧄 Flavor Boosters – Enhance the broth with grated garlic, sesame oil, or a touch of mirin for complexity.
5. Why You Should Try Chicken Katsu Ramen
Chicken Katsu Ramen is a unique fusion dish that brings together two Japanese favorites in one comforting and indulgent bowl. Whether you prefer a light shoyu broth or a rich and creamy tonkotsu, adding a crispy chicken cutlet takes your ramen experience to the next level.
Give it a try for a restaurant-quality meal at home, and enjoy the delicious contrast of crispy, savory, and umami-packed flavors!

5. Best Sauces & Side Dishes for Chicken Katsu
A perfectly crispy Chicken Katsu isn’t complete without the right sauce and side dishes to complement its flavor and texture. While tonkatsu sauce is the classic pairing, there are many other delicious sauces that can elevate your katsu experience. Additionally, serving Chicken Katsu with thoughtfully chosen sides like steamed rice, shredded cabbage, or miso soup enhances the meal and brings a well-balanced dining experience.
In this section, we’ll explore the best sauces for dipping or drizzling over Chicken Katsu and the top side dishes that create a perfect Japanese-style meal. Whether you’re looking for traditional accompaniments or creative new pairings, these ideas will take your Chicken Katsu to the next level!
-Classic Tonkatsu Sauce Recipe: Sweet, Tangy, and Umami-Rich
No Chicken Katsu is complete without a drizzle of tonkatsu sauce—the rich, savory condiment that perfectly complements the crispy, golden-brown cutlet. This Japanese-style Worcestershire-based sauce is a harmonious blend of sweetness, tanginess, and deep umami flavors, making it an essential pairing for katsu dishes.
While store-bought tonkatsu sauce is widely available, making it from scratch allows you to control the flavor balance and create a fresher, more authentic taste. Here’s everything you need to know about this iconic Japanese sauce, along with a simple homemade recipe you can whip up in minutes.
1. What Makes Tonkatsu Sauce Special?
Tonkatsu sauce is often described as Japanese-style barbecue sauce because of its thick texture, sweet-sour profile, and umami depth. It’s inspired by Worcestershire sauce but is less vinegary and more well-rounded in flavor. The combination of ingredients creates a sauce that:
✅ Enhances the crispiness of Chicken Katsu without overpowering it
✅ Balances sweetness, tanginess, and umami for a bold yet smooth taste
✅ Pairs well with various katsu dishes, including pork katsu, katsu donburi, and katsu sandwiches
✅ Is easy to make at home with just a few pantry staples
2. Ingredients for Homemade Tonkatsu Sauce
Making your own tonkatsu sauce requires just a handful of simple ingredients. Here’s what you’ll need:
- 4 tbsp Worcestershire sauce – The base of the sauce, providing tangy, umami-rich depth
- 2 tbsp ketchup – Adds natural sweetness and thickness
- 1 tbsp oyster sauce – Enhances the umami flavor (optional, but highly recommended)
- 1 tbsp soy sauce – Brings in a savory, salty note
- 1 tbsp sugar (brown or white) – Adds balance to the acidity
- 1 tsp Dijon mustard – Provides a subtle tangy bite
- ½ tsp garlic powder – For a mild garlicky undertone
- ½ tsp ground ginger – Adds warmth and complexity
Optional Add-ins:
🔥 Honey or mirin – For an extra touch of sweetness
🔥 Grated apple or pear – Used in some authentic recipes to add natural fruity sweetness
3. How to Make Tonkatsu Sauce
Making homemade tonkatsu sauce is quick and easy. Follow these simple steps:
1️⃣ In a small mixing bowl, whisk together Worcestershire sauce, ketchup, oyster sauce, soy sauce, sugar, mustard, garlic powder, and ginger.
2️⃣ Taste and adjust the seasoning, adding more sugar for sweetness, soy sauce for saltiness, or Worcestershire sauce for tanginess.
3️⃣ Let the sauce sit for 5–10 minutes to allow the flavors to meld together.
4️⃣ Serve with Chicken Katsu, using it as a dipping sauce or drizzling it over the crispy cutlet.
For a smoother consistency, you can simmer the sauce for a few minutes on low heat to thicken it slightly, but this step is optional.
4. How to Store and Use Tonkatsu Sauce
✅ Storage – Keep the sauce in an airtight container or jar in the refrigerator for up to two weeks.
✅ Best Uses – Besides Chicken Katsu, tonkatsu sauce is delicious with other Japanese dishes like:
- Pork Katsu – The original inspiration for this sauce
- Katsu Sandwich (Katsu Sando) – A crispy cutlet served in soft white bread
- Katsu Donburi – A rice bowl with a katsu cutlet and egg
- Japanese-style burgers – Adds umami depth to beef or chicken patties
5. Why Make Homemade Tonkatsu Sauce?
While bottled tonkatsu sauce is convenient, making it at home gives you a fresher, more balanced flavor with no added preservatives. Plus, you can customize the sweetness and tanginess to suit your personal taste. Once you try this easy homemade recipe, you’ll never go back to store-bought versions!
-Alternative Sauce Ideas: Spicy Mayo, Garlic Butter Sauce, and Miso Glaze
While tonkatsu sauce is the traditional choice for Chicken Katsu, experimenting with alternative sauces can elevate the flavors and add a unique twist to this crispy Japanese dish. Whether you want something creamy and spicy, rich and buttery, or deeply umami-packed, these sauce variations will bring new life to your Chicken Katsu.
1. Spicy Mayo: A Creamy Kick with Heat
Spicy mayo is a popular fusion sauce that adds a creamy texture and a mild heat to Chicken Katsu. Its smooth consistency pairs perfectly with the crispy, panko-coated cutlet, making it an excellent dipping or drizzling option.
🔥 How to Make Spicy Mayo:
Mix together the following ingredients:
- ½ cup mayonnaise (Japanese Kewpie mayo works best for a richer flavor)
- 1–2 tablespoons Sriracha or chili sauce (adjust based on spice preference)
- 1 teaspoon lemon juice or rice vinegar (for a slight tang)
- ½ teaspoon garlic powder (optional, for extra depth)
🔥 Best Ways to Use Spicy Mayo with Chicken Katsu:
- Drizzle over sliced Chicken Katsu for a bold, creamy finish.
- Serve as a dipping sauce alongside katsu bites or tenders.
- Spread on a Chicken Katsu Sandwich (Katsu Sando) for an extra layer of flavor.
👉 Pro Tip: Add a touch of honey or sesame oil for a more balanced taste!
2. Garlic Butter Sauce: A Rich, Savory Upgrade
For those who love rich, buttery flavors, garlic butter sauce is an indulgent way to enhance Chicken Katsu. This sauce melts into the crispy breading, adding a deep, savory aroma that pairs well with both rice and vegetables.
🧄 How to Make Garlic Butter Sauce:
Melt together the following ingredients:
- 3 tablespoons unsalted butter (use high-quality butter for the best flavor)
- 3 cloves garlic, minced (or ½ teaspoon garlic powder for a milder version)
- 1 teaspoon soy sauce (for umami depth)
- ½ teaspoon honey or mirin (for a hint of sweetness)
- 1 tablespoon lemon juice (to brighten up the flavors)
🧄 Best Ways to Use Garlic Butter Sauce with Chicken Katsu:
- Drizzle over hot Chicken Katsu right after frying for a buttery glaze.
- Pair with a side of garlic butter rice for a rich, cohesive meal.
- Use as a dipping sauce for an extra luxurious bite.
👉 Pro Tip: Sprinkle chopped parsley, sesame seeds, or grated Parmesan over the sauce for extra flavor and texture.
3. Miso Glaze: A Sweet and Umami-Packed Alternative
If you want a sauce with a balance of sweet, salty, and umami flavors, miso glaze is a perfect complement to Chicken Katsu. Miso’s fermented depth pairs well with crispy textures, making this glaze an excellent alternative to tonkatsu sauce.
🍯 How to Make Miso Glaze:
Whisk together the following ingredients:
- 2 tablespoons white miso paste (mild and slightly sweet)
- 1 tablespoon mirin (Japanese sweet rice wine)
- 1 tablespoon soy sauce (adds umami depth)
- 1 tablespoon honey or brown sugar (for natural sweetness)
- 1 teaspoon sesame oil (for a nutty aroma)
- 1 teaspoon rice vinegar (to balance the flavors)
🍯 Best Ways to Use Miso Glaze with Chicken Katsu:
- Brush it over Chicken Katsu just before serving for a shiny, umami-rich coating.
- Use it as a dipping sauce for an extra layer of sweet-savory contrast.
- Pair with roasted vegetables or rice bowls for a well-rounded Japanese-inspired meal.
👉 Pro Tip: Add a sprinkle of toasted sesame seeds or green onions for extra flavor and visual appeal!
Final Thoughts: Choosing the Right Sauce for Your Chicken Katsu
If you’re looking to switch up your Chicken Katsu experience, these alternative sauces offer exciting new flavors:
✅ Spicy Mayo – Creamy with a spicy kick, perfect for dipping or drizzling.
✅ Garlic Butter Sauce – Rich, savory, and aromatic, great for indulgent meals.
✅ Miso Glaze – A sweet and umami-packed alternative to traditional tonkatsu sauce.
Try these sauce variations to find your favorite way to enjoy Chicken Katsu, and don’t be afraid to experiment with new combinations!
-Side Dishes: Steamed Rice, Shredded Cabbage, Miso Soup, or Pickled Vegetables
A perfectly crispy Chicken Katsu deserves the right side dishes to balance its richness and crunch. Traditional Japanese sides not only enhance the meal but also provide texture contrast, freshness, and complementary flavors. Whether you prefer a classic pairing or want to explore new combinations, these must-have side dishes will elevate your Chicken Katsu experience.
1. Steamed Rice: The Essential Base 🍚
One of the most common and essential side dishes for Chicken Katsu is steamed white rice. It serves as a neutral and fluffy base that balances the crispy, fried chicken and absorbs the savory tonkatsu sauce beautifully.
Best Rice Options for Chicken Katsu:
✅ Japanese Short-Grain Rice – The classic choice for an authentic texture and slightly sticky consistency that holds together well.
✅ Sushi Rice (Seasoned with Vinegar) – A flavorful option if you enjoy a slight tang to contrast the richness of the katsu.
✅ Brown Rice or Multi-Grain Rice – A healthier alternative with a nutty flavor and added fiber.
✅ Garlic Butter Rice – For a richer twist, some enjoy pairing katsu with lightly seasoned garlic or butter-infused rice.
💡 Tip: For the best experience, cook the rice using a rice cooker to achieve the perfect soft and fluffy texture.
2. Shredded Cabbage: A Refreshing Contrast 🥬
A simple yet crucial side dish, shredded cabbage is often served alongside or beneath Chicken Katsu in Japanese restaurants. The fresh, crisp texture of cabbage provides a refreshing contrast to the fried cutlet and helps cleanse the palate.
How to Prepare Shredded Cabbage for Katsu:
✅ Use finely shredded fresh cabbage – The thinner the cabbage, the better it pairs with the dish. A mandoline slicer can help achieve ultra-fine, airy slices.
✅ Serve it chilled – Keeping the cabbage cold adds extra crispness and contrast to the warm katsu.
✅ Enhance with dressing – Some enjoy drizzling it with a light Japanese sesame dressing, yuzu ponzu, or a dash of kewpie mayo for extra flavor.
💡 Tip: Adding black sesame seeds or microgreens on top enhances both presentation and taste.
3. Miso Soup: A Warm, Comforting Addition 🍲
A warm bowl of miso soup perfectly complements the crispy texture of Chicken Katsu by adding a light, umami-rich broth to the meal. This classic Japanese side dish is both nourishing and comforting.
Key Ingredients in Traditional Miso Soup:
✅ Dashi (Japanese broth) – The base flavor, made from kombu (seaweed) and bonito flakes.
✅ Miso Paste – White, red, or mixed miso for a savory and slightly tangy depth.
✅ Tofu and Wakame (Seaweed) – Adds texture and boosts the soup’s umami flavor.
✅ Scallions and Mushrooms – Common additions for extra aroma and taste.
💡 Tip: Serve miso soup hot alongside Chicken Katsu for a restaurant-style experience.
4. Pickled Vegetables: A Tangy, Flavorful Contrast 🥒
Japanese pickles, known as tsukemono, add a bright, acidic contrast that helps cut through the richness of fried Chicken Katsu. Their crunchy texture and mild sourness enhance the overall dining experience.
Popular Japanese Pickles to Serve with Chicken Katsu:
✅ Takuan (Pickled Daikon Radish) – A slightly sweet and crunchy pickle that pairs well with rice.
✅ Umeboshi (Pickled Plum) – A tart and salty plum that provides a bold contrast to katsu’s richness.
✅ Shibazuke (Pickled Cucumber & Eggplant) – A deep purple, slightly sour pickle that adds a vibrant color and taste.
✅ Gari (Pickled Ginger) – Often served with sushi, this also works well to refresh the palate.
💡 Tip: A small side dish of assorted pickles enhances both the presentation and variety of flavors in your meal.
Bringing It All Together: The Perfect Chicken Katsu Meal
A complete Chicken Katsu meal balances crunch, freshness, warmth, and acidity. Here’s a classic Japanese restaurant-style plating suggestion:
🍛 Crispy Chicken Katsu drizzled with tonkatsu sauce
🍚 A bowl of steamed rice with furikake seasoning
🥬 A side of shredded cabbage with sesame dressing
🍲 A bowl of hot miso soup with tofu and seaweed
🥒 A small dish of Japanese pickles for extra contrast
By pairing Chicken Katsu with these authentic side dishes, you’ll create a well-balanced and delicious meal that enhances the flavors and textures of this beloved Japanese comfort food.
Would you like additional recommendations for modern fusion side dishes to try with Chicken Katsu? 😊

Conclusion
Chicken Katsu is a crispy, flavorful, and versatile Japanese dish that can be enjoyed in many ways, from the classic katsu with rice and tonkatsu sauce to creative variations like katsu curry, katsu sando, and katsu ramen. By using the right ingredients, cooking techniques, and side dishes, you can achieve a restaurant-quality Chicken Katsu in your own kitchen.
Whether you prefer deep-fried, air-fried, or baked versions, mastering the perfect crispy coating and juicy chicken is key to making this dish truly satisfying. Now that you have explored step-by-step instructions, common mistakes to avoid, and exciting serving ideas, it’s time to put your skills to the test!
Try making your own Chicken Katsu, experiment with different sauces and pairings, and share your favorite katsu creations.
Summarizing the Key Takeaways on Making the Perfect Chicken Katsu
Mastering Chicken Katsu involves attention to detail, from choosing the right ingredients to perfecting the frying technique. Here’s a recap of the essential points to help you achieve the crispiest, most flavorful katsu every time:
1. Choosing the Right Ingredients
✅ Chicken Cut – Use boneless, skinless chicken breast or thigh for the best texture. Pounding the chicken to an even thickness ensures even cooking.
✅ Panko Breadcrumbs – Always use Japanese panko breadcrumbs instead of regular breadcrumbs for a lighter, crunchier texture.
✅ Seasoning – Don’t forget to season the chicken before breading to ensure flavor inside and out.
2. Mastering the Perfect Breading & Frying Technique
✅ Follow the Three-Step Breading Process – Flour → Egg Wash → Panko for a coating that sticks and crisps up beautifully.
✅ Rest Before Frying – Let the breaded chicken sit for 5-10 minutes before frying to prevent the coating from falling off.
✅ Use the Right Frying Oil – Choose a neutral oil with a high smoke point like canola, vegetable, or peanut oil.
✅ Control the Oil Temperature – Maintain 325–350°F (163–177°C) to get a crispy golden crust without burning or making it greasy.
✅ Drain Properly – Place fried katsu on a wire rack instead of paper towels to retain crispiness.
3. Exploring Different Cooking Methods
While deep-frying is the traditional way to make Chicken Katsu, there are alternative cooking methods for those looking for healthier options:
🔥 Air-Fried Chicken Katsu – Achieve a crispy texture with less oil by air-frying at 375°F (190°C) for 12-15 minutes, flipping halfway.
🔥 Oven-Baked Chicken Katsu – A great alternative that still delivers crunch. Bake at 400°F (200°C) for 20-25 minutes, spraying the cutlets lightly with oil.
🔥 Shallow Frying in a Pan – Uses less oil than deep frying but still results in a crispy texture.
Encouraging Readers to Experiment with Different Serving Styles
One of the best things about Chicken Katsu is its versatility! Instead of just serving it with rice and tonkatsu sauce, try different styles to keep things exciting:
🍛 Chicken Katsu Curry – Smother your katsu in a rich, flavorful Japanese curry sauce for a comforting twist.
🥪 Katsu Sando (Japanese Sandwich) – Layer crispy katsu between soft milk bread with tonkatsu sauce and shredded cabbage for a satisfying sandwich.
🍜 Chicken Katsu Ramen – Add crispy katsu to a bowl of hot, savory ramen broth for an indulgent fusion dish.
🥚 Katsu Donburi (Katsudon) – Simmer sliced katsu in a savory soy-based sauce with eggs and serve over rice for a hearty meal.
🌮 Fusion Dishes – Get creative! Try Chicken Katsu Tacos, Chicken Katsu Bao Buns, or even Chicken Katsu Sushi Rolls for unique takes on this classic dish.
Final Thoughts
With the right techniques, ingredients, and creativity, you can make the perfect Chicken Katsu every time. Whether you stick to the traditional deep-fried version or experiment with healthier cooking methods and creative serving styles, Chicken Katsu is a dish that never gets boring.
Now, it’s your turn! How do you like your Chicken Katsu? Do you have a favorite sauce or a creative way to serve it? Share your ideas and experiences in the comments below! 🍽️😊